In the default settings of Excel, when a dataset that has blank rows is sorted, blank rows are consigned to the end of the dataset. Sometimes you may want to override this behaviour by ignoring the blank rows when sorting data.
In this tutorial we will look at the following three methods we can use to ignore blanks while sorting data in Excel.
- Hide blank rows before sorting (2 Alternative Ways)
- Use the Filter before sorting
- Use Excel VBA Code
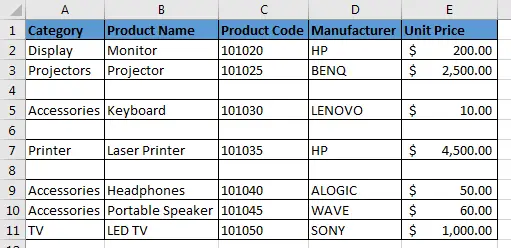
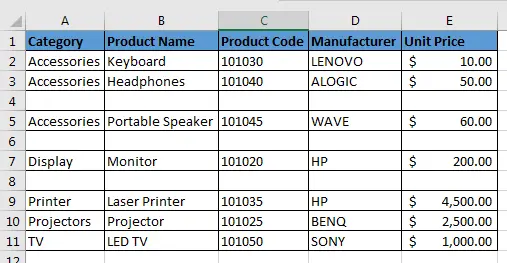
We will use the following dataset to demonstrate how each of the ways can be used:
Method 1 – Hide blank rows before sorting (Alternative 1)
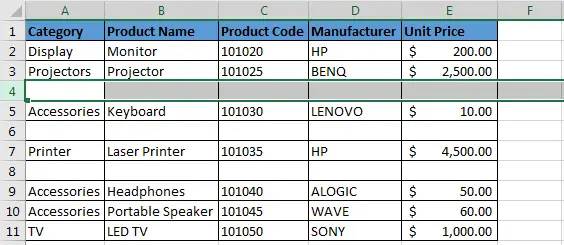
Step 1 – Click the row number of the first blank row to select the entire row. Alternatively, click on any cell in the empty row and press SHIFT + SPACE BAR:
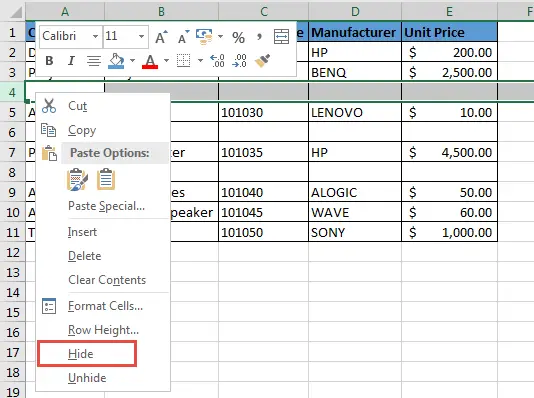
Step 2 – Right-click on the selected area and click on the Hide command on the popup menu:
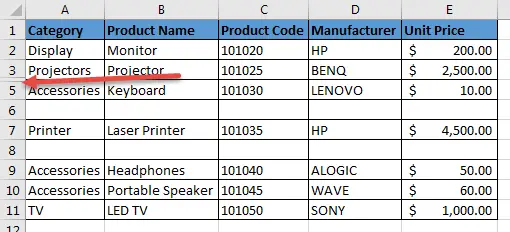
The row is hidden:
Step 3 – Repeat steps 1 and 2 to hide the remaining blank rows:
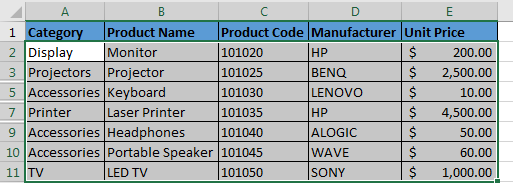
Step 4 – Select the whole data table:
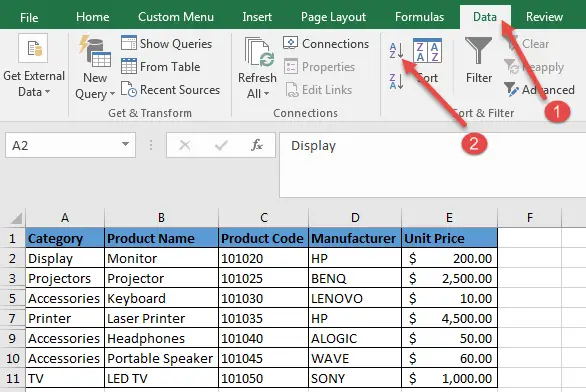
Step 5 – Click the Sort A to Z command on the Data tab:
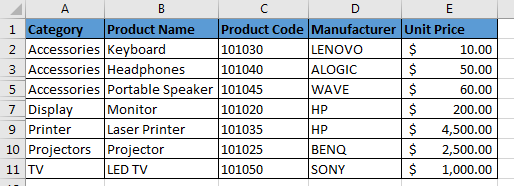
All the data will be sorted in ascending order:
Step 6 – Unhide all the hidden rows.
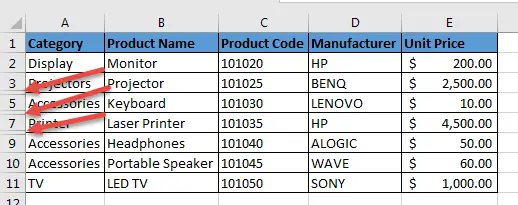
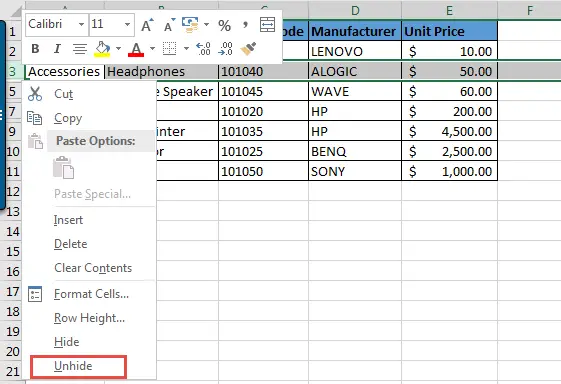
Right-click on the space between row headers 3 and 5 and click the Unhide command on the popup menu to unhide the first hidden row:
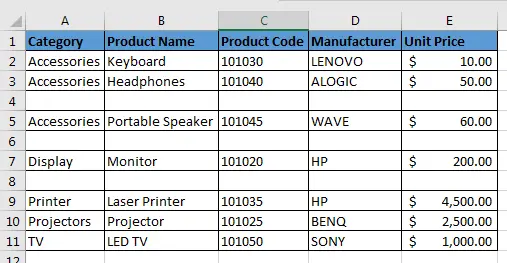
Repeat this process for all the other hidden rows. The data is sorted ignoring all the blanks:
See Also: How to Simultaneously Apply Accounting Number Format in Excel [Step By Step]
Method 1 – Hide blank rows before sorting (Alternative 2)
Hiding one blank row at a time before sorting can be a time-consuming exercise, especially when dealing with very large data sets. Do the following steps to hide all the blank rows at once before sorting:
Step 1 – Select the entire dataset.
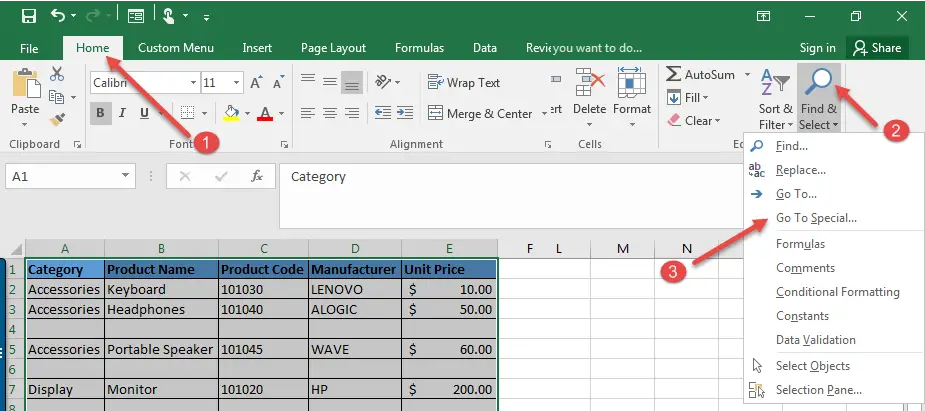
Step 2 – Click Home>>Find&Select>>Go To Special…
Step 3 – On the Go To Special dialog box select Blanks and click the OK button:
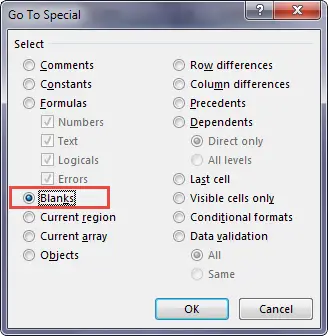
All the blank rows will be selected.
Step 4 – Hide all the blank rows by pressing the keyboard shortcut CTRL + 9:
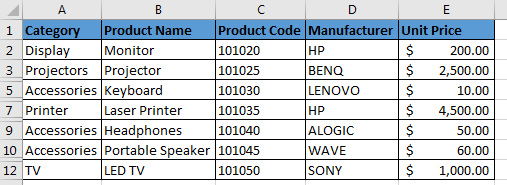
Step 5 – Select the dataset and go to Data>>Sort A to Z:
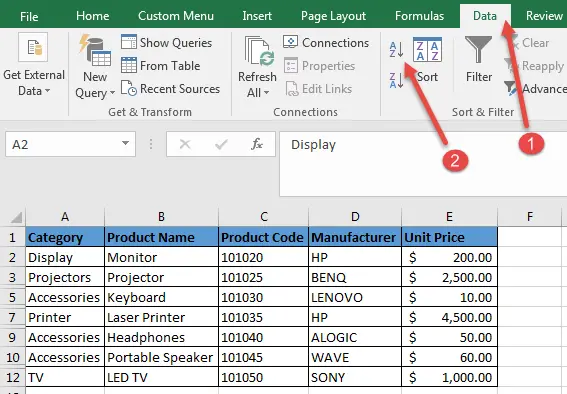
The dataset will be sorted in ascending order:
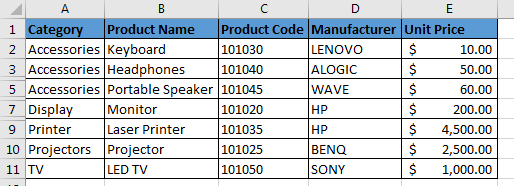
Step 6 – Unhide all the hidden rows at once using the ribbon. Go to Home>>Format>>Hide & Unhide>>Unhide Rows:
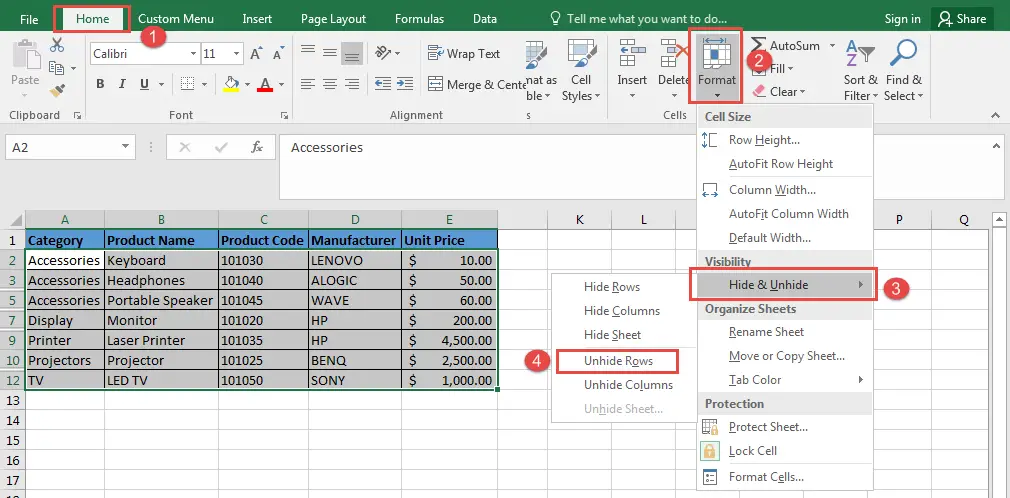
The dataset is now sorted ignoring all blank rows:
Method 2 – Filter out blank rows before sorting
Step 1– Select the dataset.
Step 2 – Go to Data>>Filter:
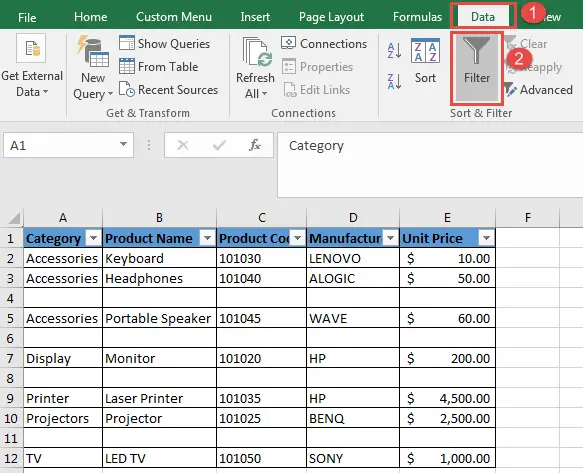
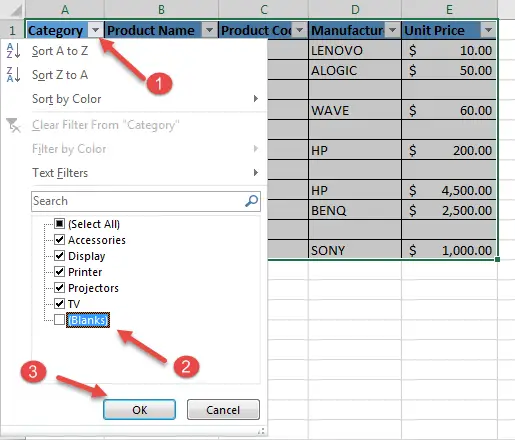
Step 3 – On the table headers click on the drop-down arrow, uncheck the Blanks option, and hit the OK button:
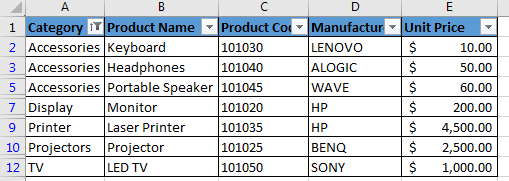
All the blank rows will be filtered out:
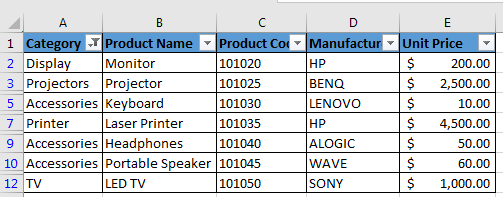
Step 4 – Go to Data>>Sort A to Z:
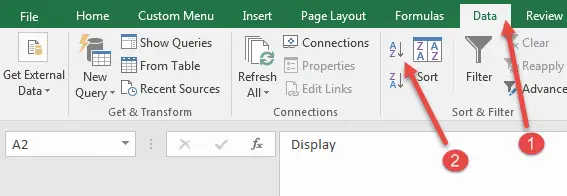
The dataset is sorted in ascending order:
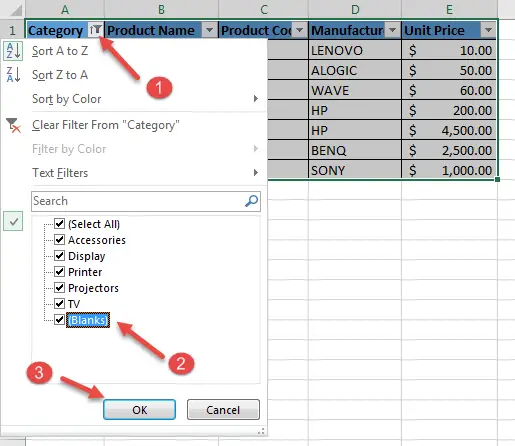
Step 5 – Unhide all the blank rows by removing the filter. Click on the Filter button, check the Blanks option, and click on the OK button:
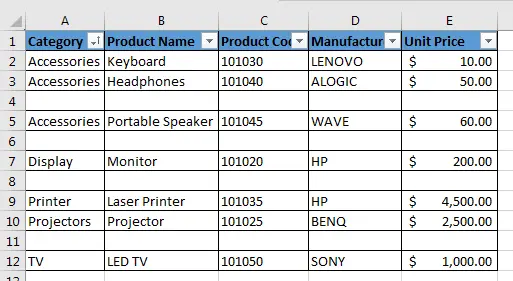
The filter is removed, and all the data is sorted ignoring blanks:
Method 3 – Sort and Ignore Blanks Using Excel VBA Code
Step 1 – Press Alt + F11 to open the Visual Basic Editor (VBE).
Step 2 – In the Project Window of the VBE, right-click on your Workbook and go to Insert>>Module:

Step 3 – Copy and paste the following code in the new module:
Sub SortIgnoreBlanks()
Range(“A1:E12”).Select
Selection.SpecialCells(xlCellTypeBlanks).Select
Selection.EntireRow.Hidden = True
Range(“A1:E12”).Select
ActiveWorkbook.Worksheets(“Original Dataset -Macro Recorde”).Sort.SortFields. _
Clear
ActiveWorkbook.Worksheets(“Original Dataset -Macro Recorde”).Sort.SortFields. _
Add Key:=Range(“A1”), SortOn:=xlSortOnValues, Order:=xlAscending, _
DataOption:=xlSortNormal
With ActiveWorkbook.Worksheets(“Original Dataset -Macro Recorde”).Sort
.SetRange Range(“A2:E12”)
.Header = xlNo
.MatchCase = False
.Orientation = xlTopToBottom
.SortMethod = xlPinYin
.Apply
End With
Selection.EntireRow.Hidden = False
End Sub
Remember to customise the code to fit your situation. For example, you can change range A1:E12 to your range and change the worksheet name to the name of your worksheet.
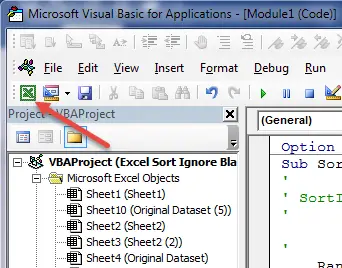
Step 4 – Save the workbook and press Alt + F11 to switch to the active workbook. Alternatively, you can click on the View Microsoft Excel button:
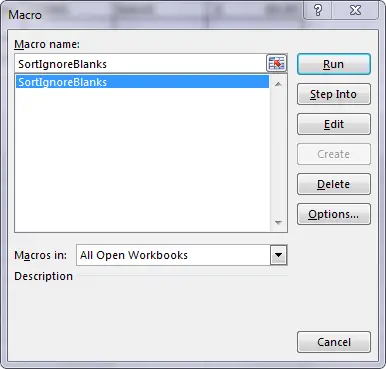
Step 5 – Press Alt + F8 to open the Macro dialog box, alternatively go to Developer>>Macros:

The Macro dialog box will appear:
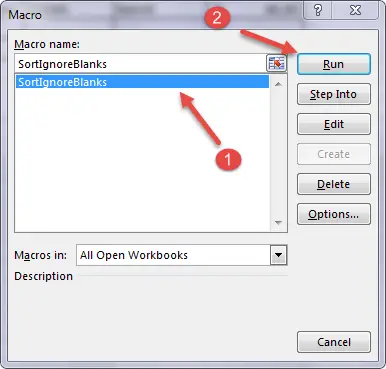
Step 6 – Select the SortIgnoreBlanks macro and click Run:
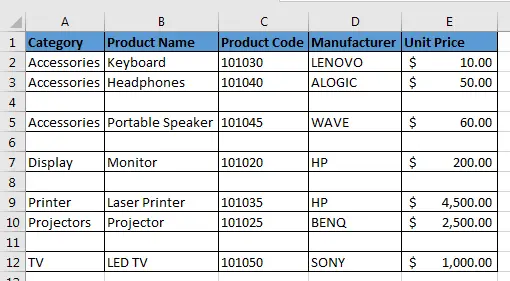
The data will be sorted at once in ascending order, ignoring the blank rows:
Conclusion
In this tutorial, we have looked at three different methods that can be used to sort data in Excel while ignoring blank rows. You can use any of the methods that are appropriate to your situation.

