Sometimes when you get raw Excel data, you will find that text, numbers, and non-alphanumeric characters are all mixed up and you will need to remove the non-alphanumeric characters before you can work with the data.
One way to remove these unwanted characters would be to go through the dataset cell by cell and delete them but this is not practical, especially when handling huge datasets.
This tutorial showcases some approaches that you can use to easily remove the unwanted non-alphanumeric characters from the dataset.
Two Methods of removing non-alphanumeric characters in Excel
The following two methods are some of the approaches you can use to remove non-alphanumeric characters in Excel:
METHOD 1 – Use the Excel SUBSTITUTE function
If your dataset has only one kind of non-alphanumeric character, you can use the SUBSTITUTE function to replace them with empty strings.
The following is an example dataset with one kind of non-alphanumeric character, the asterisk (*):
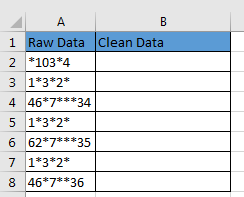
We will use the SUBSTITUTE function to replace the asterisks (*) with empty strings:
Step 1– Enter the formula =SUBSTITUTE(A2,”*”,””) in cell B2:
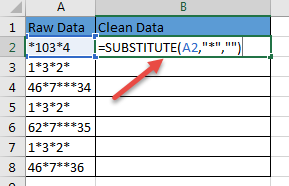
Step 2 – Press Enter key:
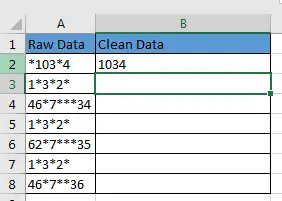
Step 3 – Use the Fill Handle in cell B2 to drag down and copy the formula to the rest of the empty cells in the dataset:
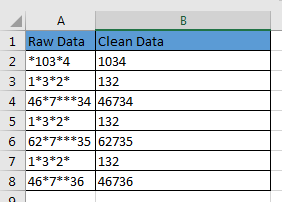
All the asterisks (*) have been replaced with empty strings.
Nested SUBSTITUTE functions
The SUBSTITUTE function cannot replace more than one non-alphanumeric character at a time.
If your dataset has 2 or more kinds of non-alphanumeric characters, you can use 2 or more nested SUBSTITUTE functions to delete them.
For instance, if you want to remove 2 kinds of non-alphanumeric characters, use 2 nested SUBSTITUTE functions, and if you want to remove 3 kinds use 3 nested SUBSTITUTE functions.
The following dataset has 2 kinds of non-alphanumeric characters; the asterisk (*) and the hash (#) sign:
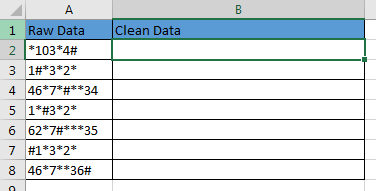
We will employ 2 nested SUBSTITUTE functions to remove the non-alphanumeric characters by the following steps:
Step 1 – Enter the formula =SUBSTITUTE(SUBSTITUTE(A2,”*”,””),”#”,””) in cell B2:
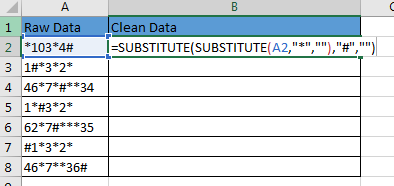
Step 2 – Press the Enter key and drag down the Fill Handle to fill the empty cells with the formula:
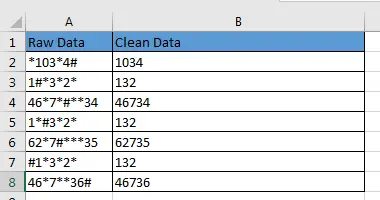
The non-alphanumeric characters have been replaced with empty strings.
You can keep on adding more and more nested SUBSTITUTE functions to your formula depending on the number of non-alphanumeric characters you want to remove. But the more you keep adding the SUBSTITUTE functions, the more your formula will become unwieldy.
A more convenient way to remove all non-alphanumeric characters at once is to use User Defined Functions.
See Also: Use Excel VLOOKUP to Return Multiple Values Vertically
METHOD 2 – Use User Defined Function
To remove all non-alphanumeric characters from your dataset, you will have to write an Excel VBA macro by doing the following steps:
Step 1– On the Developer tab, click the Visual Basic command, or press Alt + F8:

The Visual Basic Editor (VBE) window will appear.
Step 2 – Click Insert>>Module to create a new module:

A new module will be created:
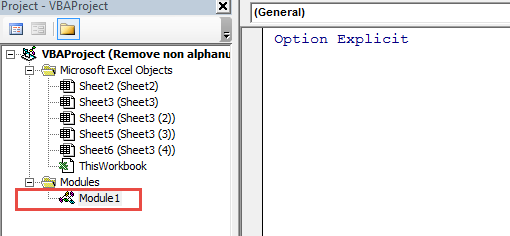
Step 3 – In the new module, enter the following code and click the Save button:
Function RemoveNonAlphaN(str As String) As String
Dim ch, bytes() As Byte: bytes = str
For Each ch In bytes
If Chr(ch) Like “[A-Z.a-z 0-9]” _
Then RemoveNonAlphaN = RemoveNonAlphaN & Chr(ch)
Next ch
End Function

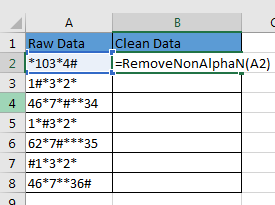
Step 4 – Click the View Microsoft Excel button or press the Alt + F11 keyboard shortcut to go back to the current worksheet. Enter the formula =RemoveNonAlphaN(A2) in cell B2 in the example dataset we are using:
Step 5 – Enter and drag down using the Fill Handle:
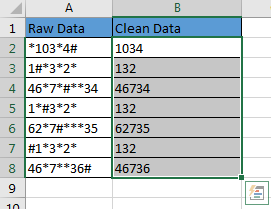
All the non-alphanumeric characters will be removed.
Conclusion
In this tutorial, we have demonstrated two methods you can use to remove non-alphanumeric characters from your dataset. You can use the one you prefer for your purposes.

